Chapter Five
of Captain Kimo’s HDR How-to Guide
 You’ve made it to the last chapter of my HDR How-to Guide. In this chapter we will enhance our HDR image using Topaz Adjust. We will also be using Topaz Denoise to remove any noise created during this process. Using Topaz Adjust and Topaz DeNoise is easy enough but there are some tricks to getting the most out of it. Below is a video on how I use Topaz Adjust to put the dynamic in high dynamic range. I also included step-by-step instructions to help guide you through this process. Click here to learn more about Topaz Software.
Topaz Video & Step-by-Step Instructions
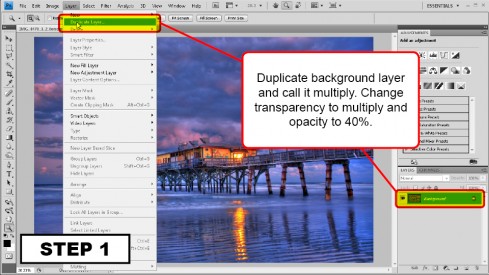
Step 1 – Create Multiply Layer
Launch up Photoshop and get your HDR image opened. The first thing we’re gonna do is create a duplicate of the original background layer. Rename this new layer multiply. Set the transparency setting to multiply and the opacity to 40%.
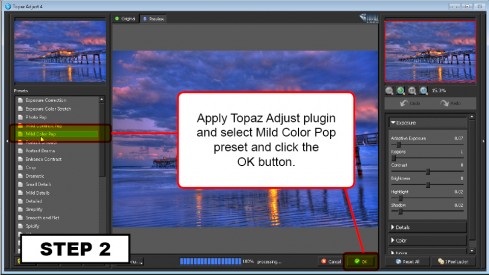
Step 2 – Apply Topaz Adjust – Mild Color Pop
Keep your multiply layer selected and apply the Topaz Adjust filter to that layer using the preset Mild Color Pop. Click the OK button to apply the filter to the layer.
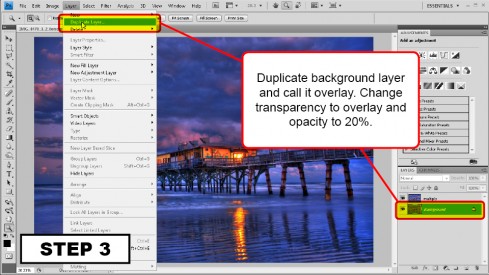
Step 3 – Create Overlay Layer
Duplicate the original background layer again and name this layer overlay. Change the transparency to overlay and the opacity to 20%.
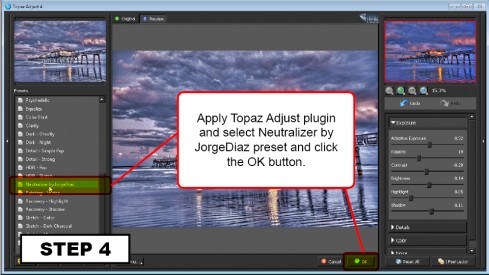
Step 4 – Apply Topaz Adjust – Neutralizer by JorgeDiaz
Keep your overlay layer selected and apply the Topaz Adjust filter to that layer using the preset Neutralizer by JorgeDiaz. Click the OK button to apply the filter to the layer.
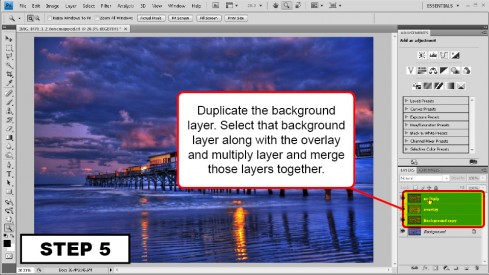
Step 5 – Merge Layers
Duplicate the background layer once again and merge that layer with the multiply layer and the overlay layer.
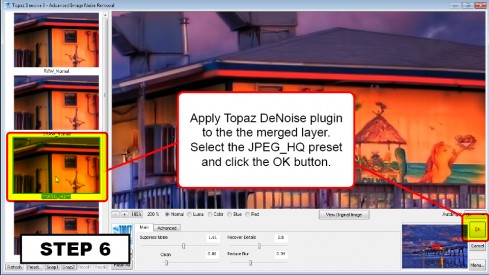
Step 6 – Apply Topaz DeNoise
This is the last step. Select the merged layer and go to Filter and launch Topaz Denoise. Select the preset JPEG_HQ. Click the OK button to apply the Filter.
Don’t stop here. If your image needs more processing keep going till you’re happy with the result!
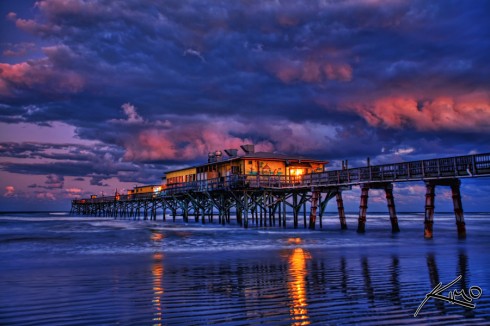
Final Enhanced HDR Photograph
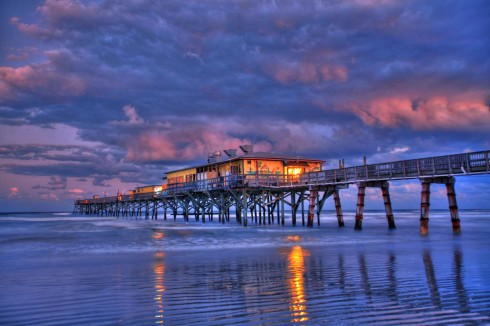
Below is the final result of the Enhanced HDR image. I’ve included the original HDR image as well for reference. Now you can see why Topaz Adjust is one of my favorite tools as a digital photographer.
That’s it for Captain Kimo’s HDR How-to Guide. If you’re ready for more tutorials check out the advanced ones below.
