Top 20 Best HDR Software Review 2023
Download Photomatix – HDRsoft.com
October 2023 Update – Dive into the Latest HDR Software Reviews! Captain Kimo, your go-to source for HDR expertise, has meticulously reviewed the top HDR software of 2023. Having experimented with numerous programs, here’s a curated list of 20 HDR tools. Remember, preferences vary, so test them to find your fit. Among these, Photomatix Pro offers renowned features. EasyHDR remains a timeless favorite for many.
It’s essential to note that my personal style is heavily influenced by Luminar, a photo editing software on the list. Each photographer’s vision is unique, so feel free to explore. Questions? Concerns? Reach out at [email protected]. Discover the perfect HDR software for your creative journey!”
1. Photomatix Pro
> Download – HDRsoft.com
Rating – ★★★★
OS: Windows & MAC
Price: $39.00-$99.00
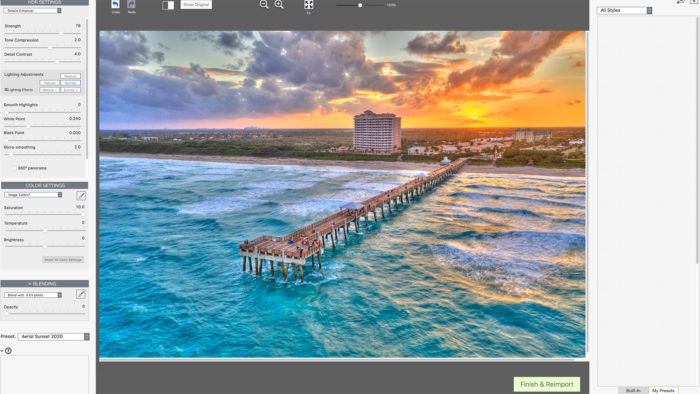
I’ve been using Photomatix Pro since 2009! This program has lots of different options for creating HDR images. I feel the software is a little dated but it still does well with producing HDR results. For those of you who are looking for intense HDR looking photos, this is the HDR program for you. Photomatix has a way of creating extreme looking HDR images that a few photographers like. I love doing extreme HDR but it does have its’ place. You can also get a realistic-looking HDR image with its other tone mapping options. Currently, I like using Photomatix for my Aerial HDR images. When I compare all my aerial photos I like the way Photomatix process the images compared to other HDR software.
2. EasyHDR
> Download – EasyHDR.com
Rating – ★★★★
OS: Windows & Mac
Price: $39.00-$65.00

EasyHDR is another great HDR software that I recommend because if offers a different look compared to the first two programs. I highly recommend this software but I think it requires a little more tinkering to get the colors right. It doesn’t have as many options as Aurora but the way it renders the final image is what I love about this program.
3. Aurora HDR (Discontinued)
> Download – AuroraHDR.com
Rating – ★★★★
OS: Windows & Mac
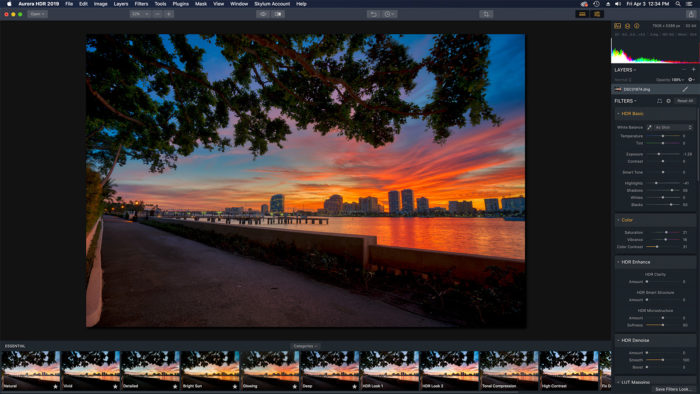
Aurora HDR is the newest HDR software on this list. I highly recommend this software for beginners and advance user as it is very easy to use and has lots of settings for HDR photo editing. You also have the ability to use layers and masking features like in Photoshop which is very helpful in developing the perfect HDR image. You also have the option to go HDR crazy or keep the HDR look more realistic. Aurora HDR also has batch processing feature which is great for doing a large number of HDR images. I use this feature daily on all my HDR real estate photos to get my editing done quicker.
4. Lightroom Classic
For those looking for a simple solution to HDR photos in Lightroom. Adobe Lightroom Classic CC has the HDR feature built right in. The HDR solution in Lightroom Classic is super basic with only three options. But results can be very realistic and pleasing. However, the dynamic range that you get doesn’t compare to any of the first three programs mentioned.
Rating – ★★★
OS: Windows & MAC
Price: $9.99 a month
adobe.com
5. HDR Projects 2018
HDR Projects 4 is a more recent HDR software that has some interesting features. Available for both MAC and Windows computers it is simple and easy to get started working with HDR images. The Lightroom Plugin that comes with it is a plus for any photographer who uses Lightroom in their workflow. I was able to export from Lightroom to HDR Projects 4 without any problems and the results were very good. The presets that it comes along with aren’t the most impressive. There are a lot of options and controls for adjustments however I found it painful to use on my 4K UHD monitor because the interface was very small. I ended up using just the presets more and make limited adjustments to the settings. Overall I feel this HDR program has a lot of potential and worth checking out. The results are beautiful if you’re looking for natural HDR photographs.
Rating – ★★★
OS: Windows & MAC
Price: $99.99
projects-software.com
6. Oloneo HDR
Another easy to install HDR program with plenty of features and settings. I loaded my first set of 5 exposures from and it handles it and produced a very clean image. At first, I thought there was no drag and drop feature but after playing around I manage to drag and drop my exposure into the small menu on the top right side. So I’m happy about that. This HDR software is packed full of feature, I not even gonna attempt to list them all. This is one program I highly recommend doing a demo download.
Rating – ★★★
OS: Windows
Price: $59-$149.00
oloneo.com
7. SNS-HDR
SNS-HDR is the other HDR program that I use. This is the HDR program I use for a more realistic result. This HDR software produces natural looking HDR images. Also I like it because it produces a unique look. I can’t really explain it you’ll have to look at the samples or better yet download it and try it yourself. This program is not recommended for the extreme HDR look but perfect for subtle results. Installation of this program is pretty straightforward. The program itself is very easy to use. The only problem I have is that it takes a few minutes to get to the tone mapping part especially when processing 5 or more RAW exposures. Rating – ★★★
OS: Windows
Price: $30.00-$85.00 Euro
sns-hdr.com
8. Machinery HDR
The installation of this HDR program went nice and smooth. Upon launching the application I was fascinated with the interface. I threw my initial 5 exposure RAW files at it and it handle it nicely. I had to sit there for a few seconds to figure out how to use it but I realized it was easier than it looks. I am very impressed with this program it has a lot of potential. It produces very nice looking HDR images. It has presets. Looks like this program is more for realistic HDR images. Boosting the settings for a more surreal look only can be very interesting but it doesn’t have the punch that I’m use to. But that’s just my flavor.
Rating – ★★★
OS: Windows
Price: $39.00
machineryhdr.com
9. Dynamic Photo HDR
Installation went smooth, interface is clean and polished. Preview window is a little small. Alignment feature is a bit tricky to understand but the option is there for fine tuning. Process with first batch of example image came out very horrid. I am thinking it does not like the RAW files I am using. Also first example exposure has a total of 5 images. I loaded only three instead 0ev,-2ev and +2ev which seems to work better. There is a problem in the shadows where there is a lot of grain instead of fill color. So to try and resolve this issue I converted the 3 RAW files into a JPG file and reprocessed the image. Converting the file to JPG really helped out a lot! The second example image seems to work fine with alignment. However being that it’s a RAW file I was getting a lot of noise in the shadow areas. Again I converted the RAW into a JPG and image came out fine.
Rating – ★★
OS: Windows
Price: $49.00
mediachance.com
10. HDR Darkroom
Another easy program to install and use. Loading the exposures require you having to browse for the image so there is no drag and drop feature like most of the other HDR programs. I loaded the initial 5 exposures which went well. there is an option to align and deghost the image so that’s always a plus. There are three options for tone mapping which is a good variety. I notice something unusual in the highlights which appears to be a magenta cast. This could be due to the RAW files being used so I processed the image again using JPG and the magenta cast seem to have gone away. It definitely handles JPG better than RAW.
Rating – ★★
OS: Windows & MAC
Price: $89.00
everimaging.com
11. HDR Expose
So far this one took the longest to install, which means it’s going to be jam pack full of features! After installing the program I find out that it doesn’t have a drag and drop feature like HDR Darkroom… bummer. After some fiddling around I created my first HDR image and somehow manage to crash the program. Second try was a success and I manage to get to the tone mapping window. My first thoughts after scrolling through the list of presets is that this program was designed for natural looking HDR. Any attempt to overcook resulted in a realistic overcooked image. HDR Expose does have an option to align and remove ghosting which is good. It seems to handle RAW files very well. I played around with JPG instead of RAW to see if there was any difference and the results were pretty much the same.
Rating – ★★
OS: Windows & MAC
Price: $119.00
pinnacleimagingsystems.com
12. HDR Efex Pro
This software comes bundled with the entire Nik Collection which is actually a good deal for the price. The HDR software option with this program can be basic but the results can be great if you like the intense HDR look.
Rating – ★★
OS: Windows & MAC
Price: $69.00
nikcollection.dxo.com
13. Luminance HDR
For a free program it was very easy to install. After installing I load the 5 exposure RAW file from the first example. It took some time to process which is understandable. It was able to handle RAW files better than some of the other paid for programs. I also like the results from the image as well. The initial controls are a little awkward but should be easy enough after some getting use to. For some one looking for something free to play around with this program produces some nice looking natural HDR images. It is a little slow but the results are worth it for the price. Also if you use the auto align feature it’s going to make it even slower. My favorite part about this program is that there is a drag and drop feature. Give this program a try it can’t hurt it’s free! Of course donate if you end up using it in your HDR workflow.
Rating – ★★
OS: Windows & MAC
Price: Free
qtpfsgui.sourceforge.net
14. Paintshop Pro 2019
Corel is a well known software company that has produce great software like VideoStudio, Painter and WordPerfect. I was pretty excited to see what kind of HDR program they were able to incorporate into their photo editing software PaintShop Pro. Yes this is a full photo editing program not just a software for creating HDR images which is actually good and bad at the same time. Installation was a breeze however don’t click too fast on the trial version because it has one of those add browser toolbars that get installed by default. Those are so annoying. After installation I found it a little overwhelming because the software is trying to everything. After a few minutes I was able to get the first 5 exposure merged and I was impressed. The results are very natural and has the ability to produce some nice colors. But that is as far as I can say about the HDR feature. If you go too crazy with the options the results don’t look good. I think this is a great program worth trying out. The HDR software is free so you have nothing to lose but time. If you don’t want to waste time I won’t recommend using it since I personally feel that the dynamic range results achieved is comparable to a single RAW. Of course I could be doing something wrong.
Rating – ★★
OS: Windows
Price: $99.00
paintshoppro.com
15. Picturenaut
Picturenaut is a free HDR program and it was one of the first HDR software that I use back in 2008. This is a very easy program to use and install. However getting the results you want might be a bit of a challenge for the newbie. While processing my first batch of five RAW exposure it seem to handle it well. But there was a slight color cast to the overall image. I was able to adjust that somewhat using the setting. Picturenaut crashed twice while I was using it but I think it was due to me going too fast for it to handle. I think this is a great program worth trying out. The HDR software is free so you have nothing to lose but time. If you don’t want to waste time I won’t recommend using it since I personally feel that the dynamic range results achieved is comparable to a single RAW. Of course I could be doing something wrong.
Rating – ★★
OS: Windows & MAC
Price: Free
hdrlabs.com
16. FDR Tool
This program has greatly improved since the last time I played around with it. Still it’s a little awkward to use compared to the other HDR programs but it creates very nice looking HDR images. I had doubt at first that it would open my first batch of 5 RAW files but it didn’t have a problem. I didn’t see and alignment tool or ghosting but I ran through this program really fast. Not a bad program.It might take some time to learn the settings to produce some high impact HDR images but I think it’s worth downloading and giving it a try.
Rating – ★★
OS: Windows & MAC
Price: NA
fdrtools.com
17. Canon Digital Photo Professional
This photo editing software comes bundled with most Canon Digital Cameras. It has an HDR feature built in but you will need the latest version. This program is very limited for HDR but it gets the job done. It’s great for a beginners who owns a Canon Digital Camera looking to produce HDR images right away. Note you will only be able to load 3 exposures with this program for creating HDR images. Program is very basic not too many options for fine tuning HDR photos. If you are really into natural HDR images this one would be a great place to start off. Especially if you don’t want to pay extra for more software. However I highly recommend getting a software with more features if you become more serious about HDR photography.
Rating – ★
OS: Windows & Mac
Price: $25.00
usa.canon.com
18. Photoshop – Merge to HDR
Adobe is also a very well software company and Photoshop is also a complete photo editing program which includes a option to create an HDR image from multiple exposures. It’s pretty amazing how advance Photoshop is when it comes to photo editing. However I can’t say the same for it’s HDR feature. The HDR option in Photoshop is probably the most basic of all the HDR software. The result from the Photoshop HDR feature are also very flat. Attempts to produce anything worth showing is very difficult. Personally you are better off blending the exposures together using Layers. I don’t recommend Photoshop for HDR at all! But if you’re going to use Photoshop as a photo editing program it’s the best out there.
Rating – ★
OS: Windows & Mac
Price: $9.99 a month Photography Plan
adobe.com
19. Fusion HDR Software
(Doesn’t look like this software is available anymore.) One of the first free HDR programs that I thought was pretty cool. There is now a small price for the program but I think it’s worth it. The program can handle RAW exposures pretty well. There are two tone mapping options available, both seem to produce very good results. This HDR program is somewhat limited but has enough to produce some decent HDR photos. Not a bad program.It might take some time to learn the settings to produce some high impact HDR images but I think it’s worth downloading and giving it a try.Rating – ★★
OS: Windows
Price: $25.00
Website N/A
20. PhotoStudio
PhotoStudio is another photo editing program with a HDR feature. The software is made by ArcSoft, not as well known as Adobe or Corel but it does produce some pretty useful programs, like Media Converter which is a pretty cool program if you need something to converter media files. But lets get back to their HDR feature in their photo editing software. It’s pretty much useless, it’s just as bad as the one in Photoshop only with even less controls.
Rating – ★
OS: Windows & Mac
Price: $79.00
arcsoft.com
Have you looked at HDR Efex Pro? It’s a plug in for Aperture, Photoshop and Lightroom from Nik Software.
Check it out at http://www.niksoftware.com/hdrefexpro/usa/entry.php.
Amazing!
Ever compared with HYDRA HDR (for Mac) ?
Which of these programs would you recommend for use with Lightroom 3
CS5 is much better than CS4 by a long shot! I’ve used NIK’s HDR program a couple of times and I think its pretty good. It is a little slow for my attention span. I do however like that they incorporated the control point feature into the tone mapping, very nice. I still like using Photomatix more. The new 4.0 release is pretty amazing.
Have you seen NIK’s HDR?? They have a free 15day trial. I like their Silver Efex Pro. I couldn’t get the trial to work– but that was my laptops problem. I heard Photoshop CS5 has a good HDR. I have CS4 and that one isn’t very good. Curious on your opinion on the NIK’s version.
Try Pinnacle or Premier… I’m assuming you mean timelaspe hdr movies.
Any software to build HDR movies ?
http://www.youtube.com/watch?v=OkbQ2FwZvYk
I downloaded Luminance HDR and was able to get an image on the screen, but unable to print. Also, which was most critical, it came with much spyware. Had to be removed with my anti-virus software.
I recommend simplycontrast.com for realistic HDR. It is an online app for HDR from single raw photos; it’s hence limited in dynamic range, but producing very realistic results and is very easy to use.
For realistic HDR photos it’s the best. IMO the software itself almost goes out of it’s way to maintain realism. However I’ve only used it a few times but I was certainly impressed the few times that I used it.